Ngspice Tutorial
Predicting the behavior of an electronic circuit using simulation tools enables us to run experiments, explore a larger set of alternatives, and verify results quickly and inexpensively.
Most modern circuit simulators are based on the SPICE (Simulation Program with Integrated Circuit Emphasis) simulator, developed at UC Berkeley, and first presented in 1973. In this tutorial, we will use ngspice, and just like the original Berkeley SPICE, it is open source.
Classes Using this Tutorial
- EE 220 Analog Integrated Circuits
Installing ngspice
ngspice is available for Linux, MacOS, and Windows machines. Visit the ngspice download page for specific installation instructions. The user manual is available here.
Our First Circuit
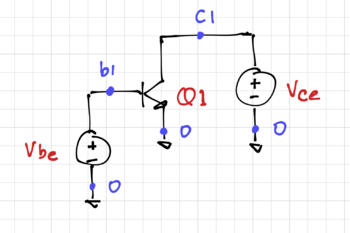
Let's simulate the circuit in Fig. 1 using ngspice. Note that we labeled every device (Q1, Vbe, and Vce), as well as labeled every unique node (b1, c1, and 0).
First, we need to describe the circuit using a "SPICE deck". In the 1970's, punched cards were used, and hence the reference to a "deck" of cards. Now, this just refers to a text file containing a description of our circuit. Since our description will contain circuit elements and nodes (or "nets"), this file is also commonly known as a "netlist".
This is the netlist for the circuit in Figure 1:
 1 * Transistor Characteristic Curves
 2 * LPA 2020-04-16
 3
 4 .include 2N2222A.lib
 5 .options savecurrents
 6
 7 Q1  c1 b1 0     Q2n2222a
 8 Vbe b1 0        dc 0
 9 Vce c1 0        dc 0.2
10
11 .control
12
13 dc Vbe 500m 750m 1m
14
15 wrdata circuit1.dat @Q1[ic]
16
17 .endc
18
19 .end
