Difference between revisions of "Lab 0: Introduction to Logisim"
(Created page with "= Quick Logisim Tutorial = == Setting up == 1) Download Logisim evolution from https://github.com/logisim-evolution/logisim-evolution/releases. Get the latest .jar version....") |
|||
| (15 intermediate revisions by the same user not shown) | |||
| Line 1: | Line 1: | ||
= Quick Logisim Tutorial = | = Quick Logisim Tutorial = | ||
| + | |||
| + | [[File:Logisim tutorial.gif|500px|frame]] | ||
== Setting up == | == Setting up == | ||
| − | 1) Download Logisim evolution | + | 1) Download Logisim evolution https://github.com/logisim-evolution/logisim-evolution/releases/tag/v3.8.0 Get the |
| + | 3.8 .jar version, as shown in the figure. | ||
| + | |||
| + | Note: Use the 3.8 JAR version if you cannot run the 3.9 version. | ||
| + | |||
| + | [[File:Logisim download versions.png|thumb|Available versions of Logisim-evolution to download]] | ||
| − | 2) | + | 2) For you to able to run the JAR file, you must install Java 16 or higher. We recommend installing the |
| − | + | Adoptium OpenJDK 17 https://adoptium.net/temurin/releases/ | |
| − | + | For Windows, get the .msi installer. | |
| + | For MacOS, get the .pkg installer. | ||
| − | 3) Once Java is installed, double- | + | 3) That's it. Once Java is installed, you should be able to run the JAR file by just double-clicking on it. As long |
| + | as the Logisim JAR file that you have downloaded came straight from the source (as linked above), it can | ||
| + | be trusted (in case your operating system complains about the JAR file being run). | ||
== Navigating Logisim == | == Navigating Logisim == | ||
| + | When you open Logisim, you should be able to see the following window: | ||
| + | |||
| + | [[File:LogisimScreen.png|300px|frame]] | ||
| + | |||
| + | Along the top, you will see some buttons. The one on the left (finger pointer), allows you to click | ||
| + | circuit elements to change their values (i.e. change an input from 0 to 1 or 1 to 0). It also allows you to inspect the wire | ||
| + | values during the simulation, which is helpful when trying to see what is happening as the simulation proceeds. The | ||
| + | one on the right (cursor pointer), is mainly used to manipulate circuit elements around the space, as well as create wire | ||
| + | connections between different circuit elements in your design. | ||
| + | |||
| + | Along the left side, you will see different selections for your circuit elements. Under the Wiring folder, the most | ||
| + | used elements are the first 4 options. Just click on one of them and put it in the space in the middle to create one. | ||
| + | |||
| + | [[File:Tunnels.png|thumb|Wiring tab, attributes, and sample usage.]] | ||
| + | |||
| + | There are different options when you click on an element, showing on the lower left portion of the Logisim | ||
| + | window. The common option that you change when creating circuit elements is the Data Bits, which controls how many | ||
| + | bits the circuit element has on its input/output, and Facing, which allows you to rotate the circuit element to make the | ||
| + | connections more concise. | ||
| + | |||
| + | These are the corresponding options for the circuit elements above for your reference: | ||
| + | |||
| + | In this diagram, we have 3 8-bit input pins connected to an 8-bit 3-input AND gate. The output of the AND | ||
| + | gate (which is 8 bits) is probed and is connected to an 8-bit NOT gate. The output of the NOT gate (which is also 8 bits) | ||
| + | is connected to a probe for output checking. Try replicating the same circuit diagram! | ||
| + | |||
| + | [[File:Gates.png|thumb|Gates tab, attributes, and sample usage.]] | ||
| + | |||
| + | A splitter allows you to combine or split wires since wires in Logisim can represent multiple | ||
| + | bits, depending on which elements are connected to them. | ||
| + | |||
| + | A pin allows you to introduce inputs to your logic gates/blocks. This is what you click with | ||
| + | the finger pointer to change to 0 or 1 to interact with your circuit. | ||
| + | |||
| + | A probe allows you to check the wire values anywhere in your circuit. It can display the | ||
| + | values of multi-bit wires. | ||
| + | |||
| + | A tunnel allows you to create 'portals' so that more complex circuits won't have a lot of | ||
| + | crisscrossing wires in them. The names of the tunnels should match to make the connection. | ||
| − | + | In this diagram, we had an 8-bit input pin that is connected to an 8-bit | |
| − | + | splitter that splits the 8-bit signal into a 6-bit and 2-bit wires. You | |
| − | + | can configure the splitter, also using the options panel on the lower | |
| − | + | right of the Logisim window, on how the splitting should happen. For | |
| + | multi-bit wires, the MSB (leftmost bit) is always the bit position | ||
| + | having the higher number. The lower 6 bits (labeled 5-0) are directly | ||
| + | connected to a probe. The upper 2 bits (labeled 7-6) are connected | ||
| + | to a 4-bit tunnel named A. A copy of that tunnel (having the same | ||
| + | name) connects to a probe. Try playing around with the options of | ||
| + | these circuit elements to replicate the same circuit diagram! | ||
| − | + | The logic gates are available under the Gates folder. You can simply create logic gates from | |
| − | + | this selection. Just like the circuit elements before, you can configure the options of these | |
| − | + | gates, specifically the number of bits for their inputs and outputs (through the Data Bits | |
| + | option) and the number of input ports that the logic gates have (through the Number of | ||
| + | Inputs option). Just like every circuit element in Logisim, you can change where the logic | ||
| + | gates are facing to make the wiring more concise if ever. | ||
| − | + | There are other blocks available in Logisim that you can play around with. Play around with different interfaces | |
| − | + | inside the Input/Output folder! Implement some logic to interact with them. Have fun! | |
| − | |||
| − | |||
| − | |||
| − | + | More complex logic blocks are inside the Plexers (multiplexers, demultiplexers, and | |
| − | + | decoders) and Arithmetic (adders, subtractors, and comparators) folder. For the Plexers | |
| − | + | blocks, you can configure how many select bits there are which will determine the number | |
| + | of inputs the block will have. This the circuit diagram below, the multiplexer has 4-bit | ||
| + | inputs and 2-bit selector. Since it has 2 selector bits, it would then correspond to 4 4-bit | ||
| + | inputs to select from. | ||
| − | + | [[File:Muxes.png|thumb| Muxes tab, attributes, and sample usage.]] | |
| − | : | ||
| − | |||
| − | + | The flipflops and registers are contained inside the Memory folder. | |
| − | + | Most of the time, we will be using Registers since they allow for | |
| − | + | multiple bits as inputs and outputs. Of course, these circuit elements | |
| + | need a 1-bit input pin for the clock. The circuit on the right is a 4-bit | ||
| + | register. The positive edge of the clock has already arrived that's why | ||
| + | the output is copying the input value. The WE input of the register, | ||
| + | which defaults to 1 if not connected, determines whether the | ||
| + | register updates every positive edge of the clock (if WE = 1), or if it | ||
| + | ignores the clock and just holds the current value (if WE = 0). | ||
| − | + | Inside the same Memory folder, we see the RAM (random access memory) | |
| − | + | and ROM (read-only memory) blocks. They are useful for processor | |
| − | + | designs. Both of these memories are addressable, and the contents can be | |
| − | + | preset by the user. Just like the other blocks, the number of address bits | |
| − | + | and data bits can be set. The circuit on the left is an 8-bit address and 16- | |
| − | + | bit data ROM, with preset values of 0xADE1 and 0xB055 in address 0 and | |
| + | 1 respectively. The input address is currently set to 1, that's why the data | ||
| + | output shows 0xB055. | ||
| − | + | [[File:Memory.png|thumb| ROM, Memory Tab, DFF, and Hex editor for ROM]] | |
| − | |||
| − | : | ||
| − | |||
| − | + | To preset the values of the memory, simply right-click the RAM/ROM | |
| − | + | module and click on Edit Contents... A new window will pop up that will | |
| + | allow the user to type in the contents (in hexadecimal format) of the | ||
| + | memory. Once the memory values are set, the window can simply be | ||
| + | closed and the contents should reflect on the RAM/ROM already. | ||
| − | + | This is the window where you can | |
| − | + | change the memory contents. | |
| − | + | You can also Save the contents of | |
| − | + | the memory to a file if you wish. | |
| − | + | Afterward, the same memory | |
| + | contents can be loaded by right- | ||
| + | clicking the memory and selecting | ||
| + | Load Image... | ||
| − | + | == Navigation tips == | |
| − | + | * Logisim has almost infinite workspace. Feel free to zoom in and out of your circuit. The Zoom scrollbar is at the bottom left of the Logisim window. You can also do CTRL + scroll wheel of your mouse to zoom in and out. | |
| − | + | * Don't forget to switch from the cursor tool (when creating/modifying circuits) to the pointer tool (when interacting with circuits) and vice versa! | |
| − | + | * You can hover your mouse pointer over a pin of a relatively complex logic block to identify the purpose of that pin. For example, hover over the input pins of a multiplexer and you'll see a small pop-up describing what the purpose of that input is. Try doing this on larger blocks like registers and ROM/RAM to know how to use them. | |
| + | * Save your designs every now and then, in case Logisim crashes for some reason. | ||
| − | == | + | == Debugging common problems == |
| − | + | Accessibility Note: In case you have a disability and find it difficult to identify these colors, please feel free to use a | |
| − | + | more convenient set of colors. To do this, go to File -> Preferences -> Simulation Tab. | |
| − | |||
| − | |||
| − | + | Logisim utilizes several '''colored wires''' to indicate the state of the | |
| − | + | signal on that wire. If a wire is not a shade of green (0 or 1) or black (for | |
| − | + | multi-bit wires), then there is a problem with the connection. You cannot | |
| − | + | properly simulate a circuit if there is any other color than green or black. | |
| − | + | See the table below for the meaning of the different wire colors. | |
| − | |||
| − | + | Here's the table formatted in MediaWiki syntax: | |
| − | |||
| − | : | ||
| − | + | {| class="wikitable" | |
| − | + | ! Color | |
| − | + | ! Meaning | |
| + | |- | ||
| + | | Dark green | ||
| + | | 1-bit wire has a value of 0 | ||
| + | |- | ||
| + | | Bright green | ||
| + | | 1-bit wire has a value of 1 | ||
| + | |- | ||
| + | | Black | ||
| + | | Multi-bit wire (many components have bit width attributes which can be configured in the attributes menu on the bottom left) | ||
| + | |- | ||
| + | | Red (values with <code>EEEE</code>) | ||
| + | | The wire has multiple values on it (in this case, a <code>0</code> and <code>1</code> from the 2 inputs). Also, remember that a big circle appears at wire junctions. | ||
| + | |- | ||
| + | | Blue (values with <code>UUUU</code>) | ||
| + | | The wire is floating (i.e. has no known value) | ||
| + | |- | ||
| + | | Orange | ||
| + | | The wire is connected to components that have different bit widths. A simple example is a 1-bit input pin connected to a 2-bit output pin. In the shown example, there's a slightly hidden wire behind the <code>MUX</code> connecting the 2-bit lower data line to the 1-bit select line. Watch out for these! | ||
| + | |} | ||
| − | + | [[File:Wire colors.png|thumb|Examples of incorrect wiring giving rise to different colors.]] | |
| − | : | ||
| − | + | '''Red wire''' values are usually due to wires having different values being | |
| − | + | connected. Remember that in logic, a wire can only be either 0 or 1 but not both at the | |
| − | + | same time! When you accidentally connect two output ports, the red wire | |
| + | will appear. Output ports drive the wire value to either 0 or 1. If there's another output | ||
| + | driving the same wire, that will cause a double-driver problem. In the image above, the | ||
| + | red wire appears because the input pins are connected. The input pins drive the wire | ||
| + | value to either 0 or 1. If there's a conflicting driver (one wants it 0 while the other wants | ||
| + | it 1), then that will cause the problem. Always ensure that only one driver (the | ||
| + | one that sets a value) is on the wire. | ||
| − | + | '''Blue wire''' values simply mean they are floating. That is, nothing is driving their | |
| − | + | values. Make sure that there is one driver (the one that sets a value) on the wire, either | |
| − | + | an output port from a logic gate/block/register or an input pin. | |
| − | |||
| − | |||
| − | + | As described in the table above, '''orange wire''' values happen when wires with | |
| − | + | two different widths are connected. Remember that in Logisim, a black wire would imply | |
| − | + | a multi-bit wire (it is more than 1 bit). Therefore, you cannot connect two wires of | |
| + | different widths because of the mismatch. This can also happen when using tunnels since | ||
| + | tunnels also define how many bits are being tunneled. Make sure that your tunnel widths | ||
| + | are consistent with the wire widths being connected to them. | ||
Latest revision as of 15:32, 19 February 2025
Contents
Quick Logisim Tutorial
Setting up
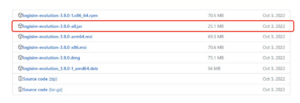
1) Download Logisim evolution https://github.com/logisim-evolution/logisim-evolution/releases/tag/v3.8.0 Get the 3.8 .jar version, as shown in the figure.
Note: Use the 3.8 JAR version if you cannot run the 3.9 version.
2) For you to able to run the JAR file, you must install Java 16 or higher. We recommend installing the Adoptium OpenJDK 17 https://adoptium.net/temurin/releases/ For Windows, get the .msi installer. For MacOS, get the .pkg installer.
3) That's it. Once Java is installed, you should be able to run the JAR file by just double-clicking on it. As long as the Logisim JAR file that you have downloaded came straight from the source (as linked above), it can be trusted (in case your operating system complains about the JAR file being run).
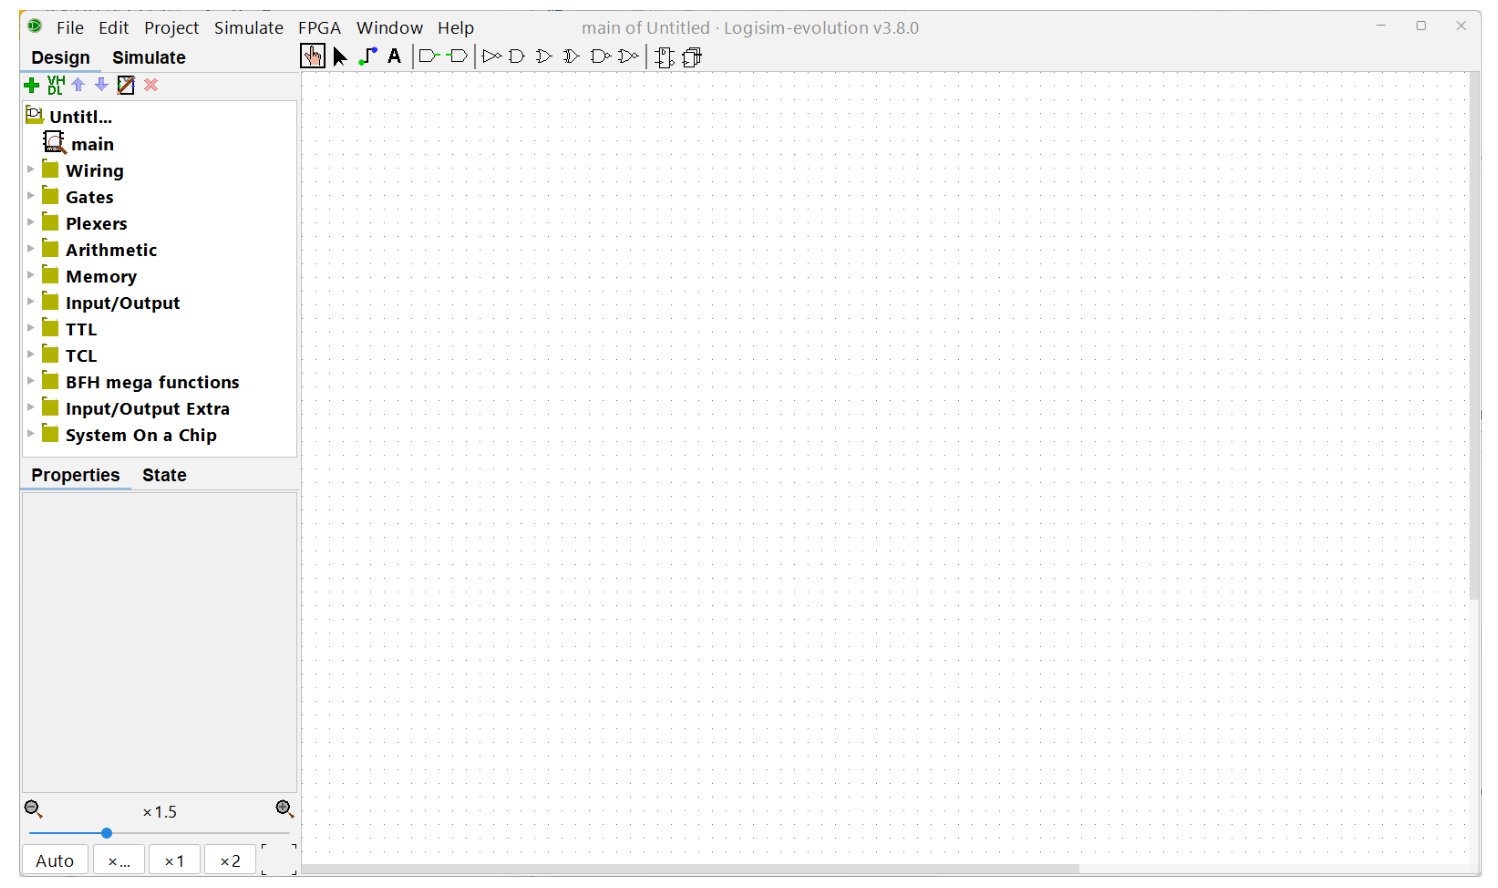
When you open Logisim, you should be able to see the following window:
Along the top, you will see some buttons. The one on the left (finger pointer), allows you to click circuit elements to change their values (i.e. change an input from 0 to 1 or 1 to 0). It also allows you to inspect the wire values during the simulation, which is helpful when trying to see what is happening as the simulation proceeds. The one on the right (cursor pointer), is mainly used to manipulate circuit elements around the space, as well as create wire connections between different circuit elements in your design.
Along the left side, you will see different selections for your circuit elements. Under the Wiring folder, the most used elements are the first 4 options. Just click on one of them and put it in the space in the middle to create one.
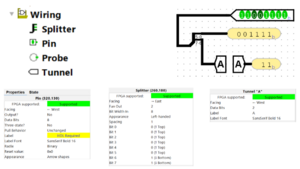
There are different options when you click on an element, showing on the lower left portion of the Logisim window. The common option that you change when creating circuit elements is the Data Bits, which controls how many bits the circuit element has on its input/output, and Facing, which allows you to rotate the circuit element to make the connections more concise.
These are the corresponding options for the circuit elements above for your reference:
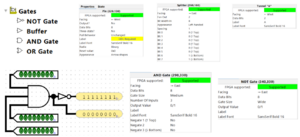
In this diagram, we have 3 8-bit input pins connected to an 8-bit 3-input AND gate. The output of the AND gate (which is 8 bits) is probed and is connected to an 8-bit NOT gate. The output of the NOT gate (which is also 8 bits) is connected to a probe for output checking. Try replicating the same circuit diagram!
A splitter allows you to combine or split wires since wires in Logisim can represent multiple bits, depending on which elements are connected to them.
A pin allows you to introduce inputs to your logic gates/blocks. This is what you click with the finger pointer to change to 0 or 1 to interact with your circuit.
A probe allows you to check the wire values anywhere in your circuit. It can display the values of multi-bit wires.
A tunnel allows you to create 'portals' so that more complex circuits won't have a lot of crisscrossing wires in them. The names of the tunnels should match to make the connection.
In this diagram, we had an 8-bit input pin that is connected to an 8-bit splitter that splits the 8-bit signal into a 6-bit and 2-bit wires. You can configure the splitter, also using the options panel on the lower right of the Logisim window, on how the splitting should happen. For multi-bit wires, the MSB (leftmost bit) is always the bit position having the higher number. The lower 6 bits (labeled 5-0) are directly connected to a probe. The upper 2 bits (labeled 7-6) are connected to a 4-bit tunnel named A. A copy of that tunnel (having the same name) connects to a probe. Try playing around with the options of these circuit elements to replicate the same circuit diagram!
The logic gates are available under the Gates folder. You can simply create logic gates from this selection. Just like the circuit elements before, you can configure the options of these gates, specifically the number of bits for their inputs and outputs (through the Data Bits option) and the number of input ports that the logic gates have (through the Number of Inputs option). Just like every circuit element in Logisim, you can change where the logic gates are facing to make the wiring more concise if ever.
There are other blocks available in Logisim that you can play around with. Play around with different interfaces inside the Input/Output folder! Implement some logic to interact with them. Have fun!
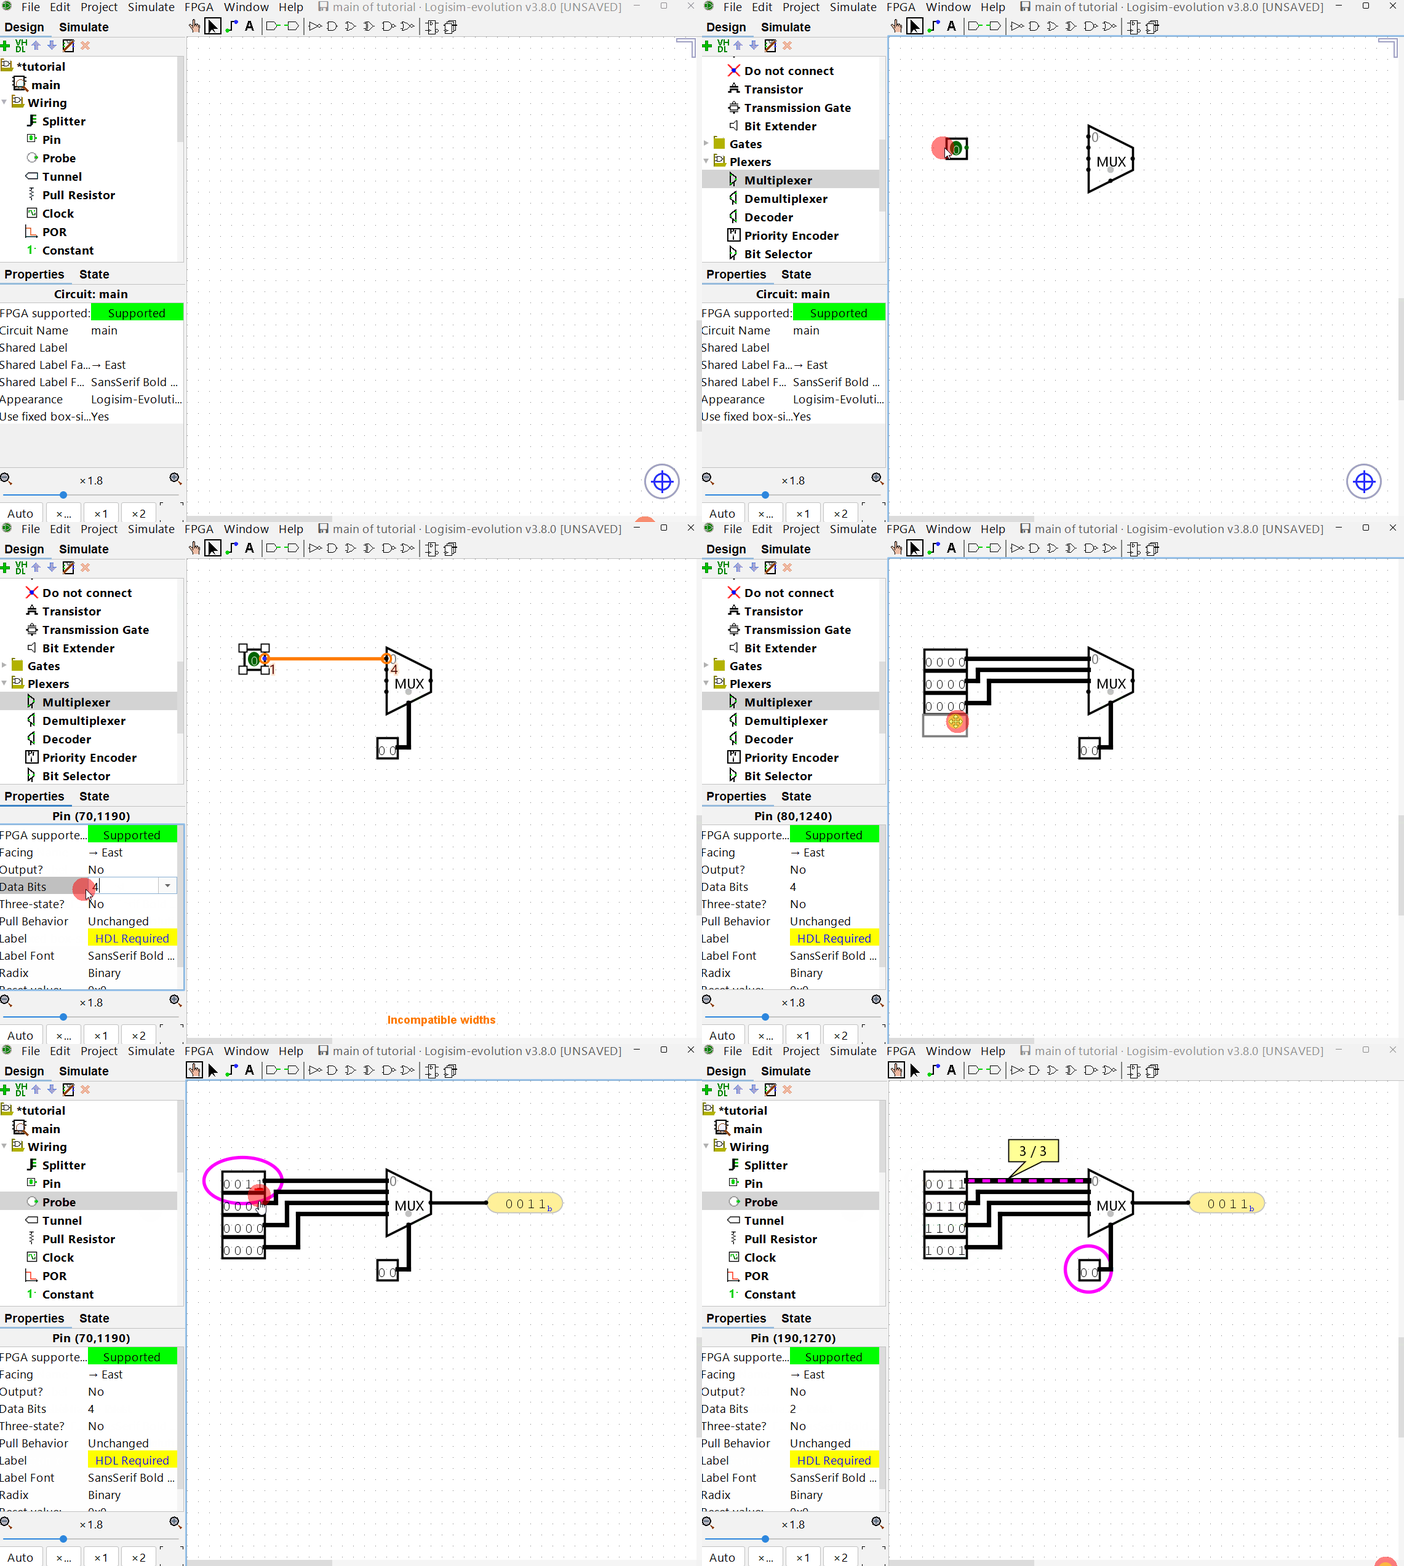
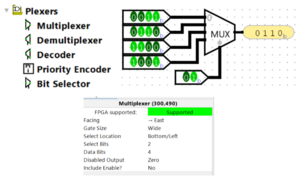
More complex logic blocks are inside the Plexers (multiplexers, demultiplexers, and decoders) and Arithmetic (adders, subtractors, and comparators) folder. For the Plexers blocks, you can configure how many select bits there are which will determine the number of inputs the block will have. This the circuit diagram below, the multiplexer has 4-bit inputs and 2-bit selector. Since it has 2 selector bits, it would then correspond to 4 4-bit inputs to select from.
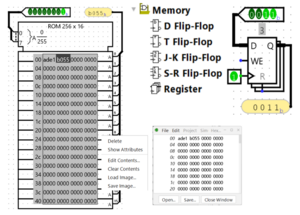
The flipflops and registers are contained inside the Memory folder. Most of the time, we will be using Registers since they allow for multiple bits as inputs and outputs. Of course, these circuit elements need a 1-bit input pin for the clock. The circuit on the right is a 4-bit register. The positive edge of the clock has already arrived that's why the output is copying the input value. The WE input of the register, which defaults to 1 if not connected, determines whether the register updates every positive edge of the clock (if WE = 1), or if it ignores the clock and just holds the current value (if WE = 0).
Inside the same Memory folder, we see the RAM (random access memory) and ROM (read-only memory) blocks. They are useful for processor designs. Both of these memories are addressable, and the contents can be preset by the user. Just like the other blocks, the number of address bits and data bits can be set. The circuit on the left is an 8-bit address and 16- bit data ROM, with preset values of 0xADE1 and 0xB055 in address 0 and 1 respectively. The input address is currently set to 1, that's why the data output shows 0xB055.
To preset the values of the memory, simply right-click the RAM/ROM module and click on Edit Contents... A new window will pop up that will allow the user to type in the contents (in hexadecimal format) of the memory. Once the memory values are set, the window can simply be closed and the contents should reflect on the RAM/ROM already.
This is the window where you can change the memory contents. You can also Save the contents of the memory to a file if you wish. Afterward, the same memory contents can be loaded by right- clicking the memory and selecting Load Image...
- Logisim has almost infinite workspace. Feel free to zoom in and out of your circuit. The Zoom scrollbar is at the bottom left of the Logisim window. You can also do CTRL + scroll wheel of your mouse to zoom in and out.
- Don't forget to switch from the cursor tool (when creating/modifying circuits) to the pointer tool (when interacting with circuits) and vice versa!
- You can hover your mouse pointer over a pin of a relatively complex logic block to identify the purpose of that pin. For example, hover over the input pins of a multiplexer and you'll see a small pop-up describing what the purpose of that input is. Try doing this on larger blocks like registers and ROM/RAM to know how to use them.
- Save your designs every now and then, in case Logisim crashes for some reason.
Debugging common problems
Accessibility Note: In case you have a disability and find it difficult to identify these colors, please feel free to use a more convenient set of colors. To do this, go to File -> Preferences -> Simulation Tab.
Logisim utilizes several colored wires to indicate the state of the signal on that wire. If a wire is not a shade of green (0 or 1) or black (for multi-bit wires), then there is a problem with the connection. You cannot properly simulate a circuit if there is any other color than green or black. See the table below for the meaning of the different wire colors.
Here's the table formatted in MediaWiki syntax:
| Color | Meaning |
|---|---|
| Dark green | 1-bit wire has a value of 0 |
| Bright green | 1-bit wire has a value of 1 |
| Black | Multi-bit wire (many components have bit width attributes which can be configured in the attributes menu on the bottom left) |
Red (values with EEEE)
|
The wire has multiple values on it (in this case, a 0 and 1 from the 2 inputs). Also, remember that a big circle appears at wire junctions.
|
Blue (values with UUUU)
|
The wire is floating (i.e. has no known value) |
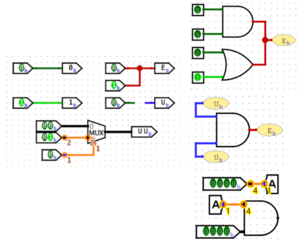
| Orange | The wire is connected to components that have different bit widths. A simple example is a 1-bit input pin connected to a 2-bit output pin. In the shown example, there's a slightly hidden wire behind the MUX connecting the 2-bit lower data line to the 1-bit select line. Watch out for these!
|
Red wire values are usually due to wires having different values being connected. Remember that in logic, a wire can only be either 0 or 1 but not both at the same time! When you accidentally connect two output ports, the red wire will appear. Output ports drive the wire value to either 0 or 1. If there's another output driving the same wire, that will cause a double-driver problem. In the image above, the red wire appears because the input pins are connected. The input pins drive the wire value to either 0 or 1. If there's a conflicting driver (one wants it 0 while the other wants it 1), then that will cause the problem. Always ensure that only one driver (the one that sets a value) is on the wire.
Blue wire values simply mean they are floating. That is, nothing is driving their values. Make sure that there is one driver (the one that sets a value) on the wire, either an output port from a logic gate/block/register or an input pin.
As described in the table above, orange wire values happen when wires with two different widths are connected. Remember that in Logisim, a black wire would imply a multi-bit wire (it is more than 1 bit). Therefore, you cannot connect two wires of different widths because of the mismatch. This can also happen when using tunnels since tunnels also define how many bits are being tunneled. Make sure that your tunnel widths are consistent with the wire widths being connected to them.
